Pages

Wednesday, 24 November 2010

Sand-Cast Aluminium Part

This part of the task was to manufacture a sand-cast aluminium part which would then be tapped and threaded to fix to another component. This will develop a number of practical and design skills.

Pattern Making:

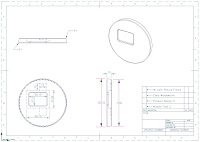
The first stage was to design the pattern to use in building the san-casting mould. I used ProDesktop 8 to design the pattern as I could use precise measurements, view the design in rendered 3D images and create an engineering drawing to use when making the pattern:

[click on images to enlarge]


The worksheet below show the basic processes involved when making the pattern:

[click image to enlarge]


Making the Sand-Casting Mould:

The following two worksheets show the process of making the sand-casting mould. This is a labour intensive process and took around an hour to prepare.


[click images to enlarge]


Casting the Aluminium:


The following worksheet shows the pouring part of the casting process.

[click image to enlarge]

The Finished Part:


[click image to enlarge]

Cutting Threads in Metal:

To attach the back panel of the cast picture frame it was necessary to cut to threaded holes into the part to receive small bolts for fixing. This involved drilling two holes using a pillar drill and a tap with wrench to cut the thread. As aluminium is a relatively soft metal this was a quick and straightforward process.

For information on metal thread cutting, click here and for more detailed information on how to use a tap and die, click here.

 Reflections:
The process of sand-casting aluminium is the most advanced metal forming that we have covered on the course, more so than the pewter-made part. The stages of the process are more complex and therefore take much more time to complete. Due to the nature of the materials more specialist equipment is needed to sand-cast aluminium, the furnace in particular, compared to the relatively straightforward brazing hearth and blowtorch required for pewter. The health and safety implications are also greater with the high temperatures involved.

These factors make casting aluminium much less common in schools as a way of forming metal. The time and expense involved are the main detractors; completing a sand-cast aluminium part takes several hours from start to finish (including making the pattern) whereas making a small part from pewter could potentially be achieved within one lesson if the students had knowledge of CAD/CAM for mould making. There is also a lot more work involved in cleaning up the cast aluminium; the surface after casting is quite rough and needs to be filed and sanded vigourously, adding more time to that already invested.

On the plus side, it is possible to manufacture an impressive end product and there are many cast aluminium products in everyday use to bring relevance to the process for students. There is also a good variety of skills that can be developed during the process; making the pattern involves either CAD/CAM or a range of handtool and machine skills, building the mould requires attention to detail, physical effort and correctly following ordered stages, the pouring would probably be carried out by a teacher or technician in a school scenario but is a good visual process for students to observe and cleaning up the casting uses filing and sanding skills.

On a personal level, I wouldn't rush to cast aluminium again unless it was really necessary for what I was doing (teaching the process to students, for example). The next time I cast aluminium I would like to experiment with using different materials for the pattern such as expanded foam or wax. This would change the process slightly insofar as the pattern would be left in the mould during casting and would rely on the heat of the molten metal to melt the pattern and push it out of the mould to leave just the cast metal. This is referred to as the lost wax method and is not so dependant on the pattern being perfectly made with correct draft angles and fine details that can be damaged when removing a pattern from the sand-casting mould. The downside to this is that the pattern can only be used once; fine if it is made using CAD/CAM but not really suitable for a handmade pattern, unless it is just for a one-off casting.

If a school class were to undertake an aluminium casting project, they could be set homework to research where aluminium comes from (bauxite ore) and the processes that are involved in refining it into the pure metal used in products. The ore is mined around the world so there are ecological, scientific and geographical implications that naturally lend a cross-curricular aspect to the project.

Links:

Tuesday, 23 November 2010

Vacuum Formed Part


For a video of the vacuum forming process used to create the above product, click here.

And, just for fun, here is a drape moulding video I made that anyone could try at home.

Vacuum forming is a process involved in making many of the everyday products around all of us. Packaging of all kinds, yoghurt pots, disposable cups, blisterpacks and food trays are examples of products that have been commercially vacuum formed. Vacuum forming has benefits for industrial production as the plastics used require low temperatures and pressures to be formed. This means that moulds and machines can be made from lower cost material than other more demanding plastic forming processes. The nature of the products manufactured by vacuum forming means that it is big business throughout the world.

Vacuum forming is a technique suited well to teaching in schools. The equipment is not too expensive - a vacuum forming machine will cost around £1500 which is reasonable compared to something like a laser cutter which may cost upwards of £10,000. The scope for use in all areas of Design and Technology is great as is shown by some case studies in the links below. The process involves making formers which is an opportunity to develop skills with tools and machines or the use of CAD/CAM, assisting with meeting criteria laid out in the National Curriculum. From a health and safety side, the vacuum forming process is very suitable for school workshops. The typical machines are fully contained units so risk of contact with high temperatures is minimised and the controls for operation are uncomplicated to use. Supervision would still be recommended, particularly for younger age groups and suitable PPE would have to be provided to students such as gloves and aprons. As plastic is used for vacuum forming, this would also be an opportunity to introduce sustainability issues to students, providing cross-curricular links to science and geography.


Links:

Vacuum formed products
Properties of high impact polystyrene (HIPS)
Vacuum forming in schools and a case study involving CAD/CAM and another case study

Pewter-Made Part

In the undertaking of this task there were several skills new to me. The first part of the task was to design the mould for using in the casting process. This was done using 2D Design, a CAD program many schools use and that a lot of students will be familiar with. Drawing the basic shapes for the mould design was relatively simple but to output the design for CNC milling some extra knowledge was required. With some advice from the technician and a crib sheet of instructions to follow, the drawing was set up with the correct fill areas, line thicknesses, colours and layout for successful milling.

The milling itself was a case of making sure the output settings were correct for the relevant CNC machine, the blank mould was correctly prepared and the tooling in the machine was correct. Some of this was pre-prepared by the technician as the equipment and tooling is expensive and easy to break if set up incorrectly. This would be sensible to replicate in an ordinary classroom situation to save time and potential expenses. When everything was set up correctly, the milling was started and it was just a case of watching the process to ensure no errors occurred.

The overall time it took to complete the design and milling was quick and fairly simple, certainly achievable by KS3 students and above. If students were make to the moulds by hand, it would take a lot longer and results would be of a lower standard compared to the excellent and consistent output of using CAD/CAM. Once the design has been completed with CAD it is there forever so multiple moulds could be made to exacting standards; this repeatability is great for the classroom as if errors occur a new mould could be made with CNC in just a few minutes. We used MDF as the base material for our moulds; a cheap and readily available material but this also has some limitations. The inside layers of MDF can be quite fragile so when the part is removed from the mould after casting, small details of the mould can come away meaning a new mould would have to machined for re-casting. The mould I designed was quite robust and was completely intact after casting but the technician informed me that the best they have achieved from one mould was four casts.

Using CAD/CAM to produce the moulds also gives the opportunity to highlight links to industry and mass production - something a teacher could use in the classroom to give perspective to the task or set as a research homework for students to include in their write up. This could particularly useful for cross-curricular links as pewter has a great history in this country with a flourishing industry.

The casting process as described on the sheet above was very simple quick, enabling a finished product (bar cleaning up) to be manufactured in a few minutes. This means that for a class of 25, this task could possibly be completed in two lessons. Students learn about CAD/CAM, use some basic hand skills (filing and sanding) and learn how to melt and cast pewter so this is a well-rounded project to undertake. As with everything, there are limitations to how pewter casting could be used in schools. These would mostly be the complexity of the moulds produced and the equipment available to use. These factors would have major bearings on the time it would take to complete the task, always an issue in schools! If there was a knowledgable technician on hand to help the teacher, such as we had, this would be a great help in organising and executing the project.

Health and safety is, of course, a consideration for pewter casting as high temperatures, naked flames and tools are involved. The pewter used these days is safe in relation to that used pre mid-1700's which contained poisonous lead; it now consists of tin, copper and antimony. Pewter casting is safe enough for KS3 students to undertake as long as they are made aware of the hazards, provided with the correct protective equipment and have sufficient supervision.

As pewter casting in schools may be the only chance for a student to learn about forming metal, it is important for a teacher to raise awareness of the possibilities of the process with relation to what products can be made and careers that it might be involve in. Pewter casting can be used for jewellery making, a common topic in Design and Technology in schools, sculptures, tankards and trinkets to name a few products. If given the chance to cast pewter, a student may develop a deeper interest that could lead to career ideas in the future.

For more information on pewter casting in schools and in industry follow the links in this sentence.